
Search Knowledge Base by Keyword
How to use the Character Knowledge Base
Everything not saved will be lost.
-Nintendo “Quit Screen” message
This article will focus on editing articles that were previously built using the Divi Builder and making new articles using any of our pre-built templates. I, or someone else, may follow this article up with one for the Default Editor and/or and Advanced Divi Builder article focused on developing your own templates from scratch. The latter will probably be the best resource for those looking to build super fancy Logs using Divi.
I’m starting from the middle with this article. The Default Editor is much simpler and making articles from scratch (in Divi) comes with a steep learning curve. My hope is that we’ve already laid a nice foundation to build from and the majority of the player base will only ever need the instructions detailed here.
Before we dig into it, let’s answer an important question: What IS the Knowledge Base?
Think of it like a wiki that is “in universe”. This is the collaborative efforts of all characters to compile and disseminate knowledge in a succinct and organized fashion.
Knowledge Base articles will never replace Mission Logs, which remain the recorded experiences of our characters.
Divi is powerful but not super intuitive. The first thing you need to understand is: “Blue, Green, Grey”…

Blue Sections form the page. Green Rows exist within the Sections. Grey modules occupy space within the Rows. In the above image, the grey Module is a text Module. In fact, the text you’re reading now its written in a grey text Module. The colors aren’t important honestly, they’re just a quick visual indicator of what part of the page you’re working on.
Let’s look at a more complicated example:

What is going on here? New colors, an insane amount of modules, specialized (orange) sections? Ain’t nobody got time for that. Don’t get intimidated, the above image is only show how the Sections, Rows, and Modules can be organized.
If you’re not starting a brand new article (and you’re logged in) you should see an “Enable Visual Builder” button in the top left. This is the button that will allow you to edit articles. Once the “Visual Builder” (Divi) has loaded, the button will change to read: “Exit Visual Builder”. After you save whatever changes you make, this will switch you back into a normal viewing mode.
When you’re in Divi, a small purple circle will appear centered at the bottom of your screen. You can click it to expand it into several new UI elements.

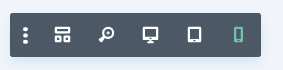


This UI element is mainly for testing out how your page will look on different devices.
Here you can trash the page, hide the additional elements, edit the articles Title/Excerpt/Featured Image, undo changes, and import/export layouts (templates).
This last element is for finding page actions, changing layers, finding help, and saving your work.
The first button on each of the top bars is for dragging that element around. You’ll see shadows of a correspond color appears to indicate where your element will be dropped.
The second button opens the customization options for the element.
The third button makes and exact copy of the elemental and places it with the same grace and care that Microsoft Word exhibits when inserting a picture.
Let’s talk about an example from earlier:
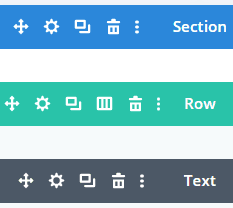
The second to last button on each bar deletes the element.
The last button options a wormhole to another dimension. Don’t touch it, especially the “Split Test” option.
The odd-man-out here is the fourth button on the Row (green) bar. Rows can be subdivided into columns, allowing for multiple modules to be placed side-by-side. This part of the guide is using a Row with 3 columns.
Advanced Tricks
Inter/Intradocument linking:
You can link to specific parts of a document either across documents or within a document.
Example One: SI Rule Variants has an index at the top which allows for easier navigation on a large page. Clicking a link sends you straight to that part of the document.
Example Two: Onnuphi is a key NPC but doesn’t currently have his own page. His details are currently stored on The Great Khenran Empire page. I’ve made it so that I can link directly to his part of the page.
The process is basically the same for each but both examples are slightly different due to different modules being used.
Example One: Simple
On the SI Rules Variants page, I set up an index at the top by linking to headings within the page. To be able to link to the headings we need to add a little bit of code in the text box. First you need a “heading”. In the picture below, notice how “Portal Travel” has the text type: “Heading 2” applied to it.

Once you have a heading, switch over to the “text” tab and look for yout heading. It should have some code surrounding it like: “<h2>Portal Travel</h2>”.
Add in an “id”, which will be the word you want to use in the link: “<h2 id=”portaling”>Portal Travel</h2>”. After saving, the section should be accessible the the url: https://sleeperisland.eu/cookbook/gameplay-on-si/#portaling

Example Two: Less Simple
The first example works for simple text modules. For any other modules you’ll need to get creative. You can effectively “hide” a heading by not putting any display text. Using the example from before it would become:
“<h2 id=”portaling”></h2>”
Below I’m working with a “Person” module and had to hide a heading I didn’t want displayed:

With that “hidden” heading, this specific section can be linked to with:
https://sleeperisland.eu/knowledge-base/the-great-khenran-empire/#onnuphi